
The goal of this article is to have a single page application developed with angular 2. Apart from connecting to office 365 with Azure Active Directory credentials, the application shows some data fetched from the office 365 tenant such as OneDrive files and Outlook Emails from the current logged user. It was all accomplished using the Angular2 routing system.
Even though this is the second part of the Angular2 and Office365 with ADAL unified APIs [PART 1], a few things may be different as angular2 beta version has just been released. In the previous article I worked with the alpha version, whereas in this example I used angular2 beta version.
Now, let’s begin!
Office 365 Adal Service
Personally, I think this is one of the most important components of this application. Office 365 Adal Service takes care of the link between the application and the office 365 tenant. So, the first thing I did, was modify the ADAL Service.
As I was going to make HTTP requests against the O365 Tenant, I imported the http and the header module from angular2. Also, I added some extra functionality to the service. I created the following two new methods to handle all the requests.
- A private method called tokenPromise that takes a string parameter with the Url of the endpoint and return a promise of the request of the authorization token over the office 365 tenant.
- A public method called getRequestPromise that takes a string parameter with the partial Url for the request, and return promise of the requested url.
Notice that before returning the request promise, I modified the header and included the authorization token that I got from the tokenPromise request.
1 | headers.append('Authorization', 'Bearer ' + token); |
All the requests to the Office 365 APi should be done through the getRequestPromise method.
Base Component
As I was going to use the service in all components and routes in the page, I decided to develop a basic class with an office 365 service property so all the classes would inherit from this base class.
When another class inherits from the base class, apart from the office 365 service instance, a Boolean parameter must be provided. With this parameter the application handles whether the user can see the page content or not, depending if the page is Private and if the user is logged in.
In case the user is not logged in, the application will redirect the user to the Office 365 login page.
App
In this file, previously called bootstrap.ts, I made a lot of changes from the first example shown in the previous post.
Apart from importing some components from angular2 libraries to be able to configure the router, I imported all the components for each route in the application and then defined each route within the RouteConfig decorator, indicating which route should point to which component. I also added a wildcard, just in case no route is specified, to go to the Home route.
Finally, included all the routes components and the ROUTER_DIRECTIVE within the component decorator.
1 | ([ |
Those are the most significant changes, though it is worth mentioning a new parameter added to the constructor of the class, a location object just to be able to now the current route, and the inheritance from the Base Component.
Two of the many changes I had to make because of the release of the Beta version are:
- The View decorator is gone and now everything goes to the component decorator.
- The Bootstrap method invocation is now in a separate file.
Master Page
As you can see in the html code, each navigation link has a RouterLink directive. This directive links the href attribute of the anchortag to the specified route of the application.
Another important directive in this page is the router-outlet. The reason why I called this page “Master-page” is because inside the router-outlet directive is where the current route will get rendered and displayed, so the router-outlet directive will work as a content place holder.
A router outlet is a placeholder that Angular dynamically fills based on the application’s route.
Routes
I won’t talk about each route created for this example; I will just mention one of them because they are all practically the same.
Messages Class
This is a simple class where I just imported the components I needed and put them all together to be able to get the data from my office 365 tenant and show it to the user using the specified template.
In this case, the page requires the user to be logged in and, as it inherits from the Base Component, I just passed a true value as a parameter to the constructor and let the base component handle the validations.
It is pretty much the same for the rest of the route components as I set the classes to inherit from the baseComponent class. I just passed in the specific parameter inside the constructor and then executed the request to fetch the date from the given URL. For the messages, the request URL is “/beta/me/messages”.
Here you can see the most common queries using Microsoft Graph API, and here you can test the queries against your own Office 365 tenant, which is nice and useful.
Notice I added the NgFor directive within the Component decorator so I could use it on the html template.
Messages HTML
For the representation of the data the important part is the usage of the ngFor directive. The syntax is very simple to understand and inside the template I just showed the date for each message contained in the messages array within the messages class component.
1 | <tr *ngFor="#message of messages"> |
I also used the DatePipe just to give format to the sentDateTime property. Pipes in Angular2 are what we used to know as Filters in angular 1.
Bootstrap
So, following the examples from the angular2 team, I moved the bootstrap method invocation to a separate file and I let the dependency injection take care of the dependencies on the O365App by passing the router and the http components.
Putting it all together
With all these changes and the proper Azure active directory configuration, I was able to see some information I had on my office 365 tenant.
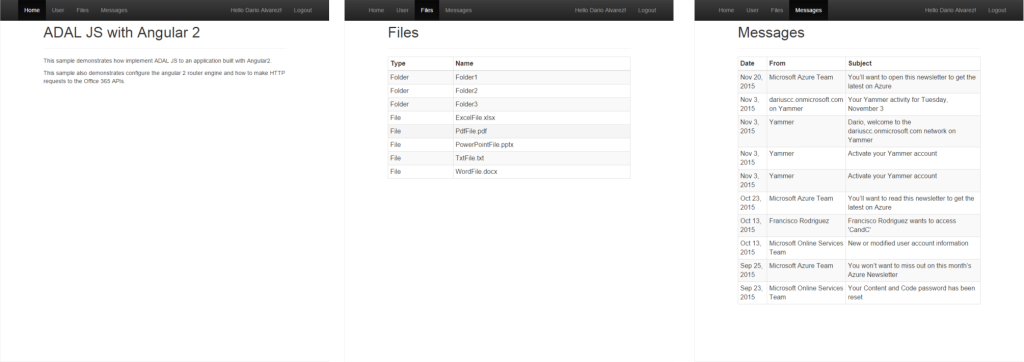
And, that’s it!!! There you have an application developed with Angular2 showing information fetched from Office 365. EASY!
Code
Here is the complete code of the application in case you want to take a look at it.
To run and test the application with your office 365 tenant, you have to edit the service file and put your own tenant and the application ID from the Azure active directory application.
Hope you like it and find it useful.